You want to DIY your floors? We love the idea, and want to make sure your next project is a success! This route isn't always the most welcoming to newcomers, however, which means we need to start preparing you to avoid the pitfalls that others who have walked this path have fallen victim to. This guide will help you plot a course around the common errors that can turn a rewarding project into a frustrating headache, and with any luck, your next DIY voyage will be smooth sailing. Let's begin...
Slight Gapping
A little bit of gapping between planks isn't unusual, especially with solid hardwood and engineered wood flooring. It's rarely a sign of a major problem, but it’s frustrating to see! This often stems from the responses of your flooring material to its ambient environment. Wood in particular, being a natural material, reacts to changes in temperature and humidity. In the summer, it tends to expand; in the winter, it tends to contract. Failing to account for this movement can lead to those unsightly gaps.
We recommend paying very close attention to the manufacturer’s recommendations regarding expansion gaps around the perimeter of the room before you attempt that DIY install. These gaps are crucial! Typically, you'll need ¼ to ½ inch of space around walls, door frames, pipes, and any other fixed objects. Use spacers during installation to maintain this gap. For wider rooms, consider expansion gaps within the room as well (again, be sure to check the manufacturer’s guidelines).
Visible Seams and Predictable Patterns
Visible seams and predictable patterns are two of the most common issues people face when installing hard-surface flooring, whether it’s solid hardwood, engineered hardwood, vinyl, laminate, or hybrid resilient. Here's the breakdown...
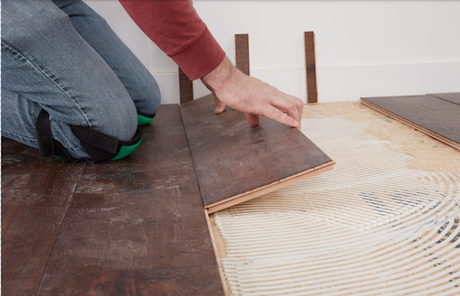
Visible seams occur when you install your flooring planks without proper overlap or staggering, creating a linear (or zigzag) pattern that disrupts the floor’s continuity. The root of the issue is often a lack of randomness in the installation process. If you install planks or tiles from the same box consecutively, the seams will tend to line up and stand out, creating this jarring visual effect. To avoid this, you need to mix up the materials from different boxes and stagger the seams. A general rule of thumb is to stagger the end joints by 6–8 inches, which helps break up the linear appearance and creates a more natural, blended look. This approach works for all flooring types, but it’s especially important with manufactured materials like vinyl and laminate, which often have repeating patterns.
Now, what do we mean when we say "repeating patterns"? Many manufactured flooring products (think vinyl, laminate, hybrid resilient) are designed to mimic natural materials such as wood or stone. However, these designs are often created in batches, which means the same visual elements repeat across multiple boxes. If you don’t mix the boxes properly, this repetition can create a pattern that’s instantly noticeable.
Again, the solution to both these issues is the same: randomization. Before you start installation, take time to mix planks or tiles from different boxes and lay them out to see how they’ll look together. If you notice repeating motifs or visible seams, adjust your approach before proceeding.
Minor Scratches and Dings
Accidents happen! It's practically a law of DIY. Dropping a tool, bumping a piece of flooring while moving furniture...it’s unavoidable. These minor imperfections can feel disheartening, and while you can choose to embrace them as part of your finished floor's charm, you could also use a touch-up kit to address small blemishes. Additionally, as a preventative measure, you may want to use felt pads underneath your furniture legs to prevent future scratches. Be careful when moving heavy objects, and consider using furniture sliders to help mitigate potential damage to your flooring.
Uneven Transitions
Transitions between different floor types, or where your flooring meets a lower surface, can look awkward if not handled correctly, and even result in a tripping hazard if you really botch the job. To prevent this, you'll need to address the height differences thoughtfully to ensure a smooth, gradual transition.
The approach you take depends largely on the extent of the height difference. For smaller variations, a transition strip is often sufficient. These come in a variety of materials and finishes, designed to be glued or screwed in place, visually bridging the gap and creating a flush connection. Consider the surrounding flooring when selecting a transition strip to maintain a cohesive aesthetic. For more significant height differences (generally anything beyond a quarter inch) a reducer becomes necessary. These wider transition pieces gradually slope down, easing the change in level. When choosing a reducer, be certain the material and finish complement your adjacent flooring, and remember, matching the profile is just as important as the material itself; as a mismatch can create a noticeable visual jolt.
Miscalculating Material and Waste
Let's be point-blank: underestimating material is a recipe for disaster. Imagine being halfway through your project, realizing you’re short on planks: it's a frustrating and expensive setback. Sadly, newbie DIYers often focus solely on the square footage of the room without accounting for waste, which arises from cuts, angled corners, and fitting planks around obstacles, etc.
Always, always factor in waste to your flooring material calculations. The standard recommendation is 10-15% extra, but for intricate patterns (herringbone, chevron), or when dealing with short planks, you'll want to increase that to 15-20%. Some installers even go higher for complex designs. You can consult online flooring calculators, or even ask for help from our knowledgeable flooring experts at Lumber Liquidators; we're here to help you get the right amount!
Incorrect Cuts or Layout
Achieving a professional-looking finish also hinges on precise cuts and layout. Awkward cuts around doorways and corners not only detract from your floor’s appearance but can also compromise stability. Rushing cuts or failing to accurately measure leads to gaps, visible seams, and a generally unprofessional result. Before you begin, practice cuts on scrap pieces to get a feel for the material and necessary angles.
Careful planning and precise measurements are key, so use a sharp pencil for marking cuts and always double-check those measurements before making the cut. For complex cuts, consider using a level to ensure accuracy. Paying close attention to angles around door frames and closets is especially important; a tight, professional fit requires thoughtful planning and meticulous execution.
Subfloor Problems
Beyond visible problems, the hidden scourge of subfloor contamination can sabotage your flooring project before it's even begun. Moisture, debris, or existing adhesives can interfere with adhesion and stability, leading to squeaks, warping, and even mold growth (problems that often manifest after the flooring is installed, making them incredibly difficult and costly to fix).
Removing old glue, nails, or staples requires effort (a scraper and wire brush are your friends here). If dealing with existing carpet or adhesive, a specialized adhesive remover may be necessary. To prevent moisture-related issues, especially on concrete subfloors, a moisture barrier is a wise precaution. Always use a moisture meter to check the subfloor’s moisture content, following the manufacturer’s recommendations for acceptable levels.
In addition to clean and moisture-protected, you'll also want to make certain that your subfloor is flat. An uneven subfloor isn’t just an aesthetic problem; it fundamentally compromises the integrity of your floor, leading to instability, relentless squeaks, and premature wear. Even seemingly minor imperfections can become major issues over time, creating a floor that’s prone to damage and discomfort. Self-leveling compound can help here, and never hesitate to reach out to a professional to ensure that your subfloor is "on the level" before you get your project underway.
Using the Wrong Tools for the Job
Attempting to install flooring with inadequate tools will leave you frustrated every time, in addition to creating a potentially dangerous scene. A dull blade, a flimsy tapping block, or a lack of proper safety equipment can turn a manageable task into a grueling ordeal. Invest in the right tools (a quality miter saw is essential for accurate cuts, for instance, while a tapping block and pull bar are crucial for tight seams in click-lock flooring) and don't skimp on safety equipment, either. Rent or borrow tools if purchasing isn't feasible, but ensure they’re in good working order.
Forgetting to Acclimate Flooring
Finally, and most critically, remember to allow your flooring to acclimate to the room’s temperature and humidity. When overlooked, the lack of acclimation will lead to significant problems down the line. If the flooring is installed before it has acclimated, it will continue to expand and contract excessively after installation, leading to gaps, cupping, and other issues. Always allow your flooring to acclimate for the recommended time (usually 48-72 hours) in the room where it will be installed. Stack your boxes flat and uncovered to allow the wood to breathe, and most importantly, follow the manufacturer's instructions.
Lumber Liquidators Is Here to Help!
Installing a new floor is a big undertaking, but with careful planning and attention to detail, you can achieve beautiful, long-lasting results. Don't be afraid to ask for help! At Lumber Liquidators, our team of flooring experts is here to guide you through the entire process. Visit your local store or continue browsing our website for a wide selection of flooring options and helpful resources.